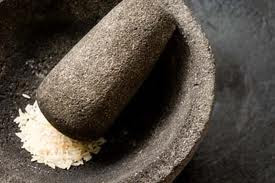
A mortar is a bowl shaped container made of a hard wood, marble, pottery, or stone. The pestle is a bat shaped tool that is used to grind inside the mortar (bowl) and pulverize grains, herbs, and other food substances as well as medicines.
Italian frescoes of the 15th Century show Mortars and Pestles in use by Apothecaries (ancient Pharmacists). The Molcajete, or Mexican version of the mortar and pestle appears in Mexican pre-history in the Tehuacán Valley, as early as the discovery of our hybridized present-day corn, 6,000 years ago.
Italian frescoes of the 15th Century show Mortars and Pestles in use by Apothecaries (ancient Pharmacists). The Molcajete, or Mexican version of the mortar and pestle appears in Mexican pre-history in the Tehuacán Valley, as early as the discovery of our hybridized present-day corn, 6,000 years ago.
Place the substance to be ground inside the mortar (bowl). Sit the pestle on top of the substance and apply downward pressure, then grind using a circular motion. This action forces the substance against the surface of the bowl and pulverizes it.
The continued grinding releases oils and the purest essence of whatever food product is being ground. This process can be quite laborious. This told is part of the art of cooking. In my opionion every cook or chef should have one in their arsenal of tools.
I found almost as many variations of the mortar and pestle as there are people who make them. Many are collectable and handmade pieces of art. The Mexican version is called a Molcajete and is typically made from stone or lava stone. They need to be soaked and ground quite rigorously before used with food. If you’re not familiar with a molcajete, it is a Mexican mortar and pestle. The term molcajete actually refers to the three-legged round bowl, which has been carved out of basalt. The pestle, which is known as the tejolote, has also been carved out of the same volcanic rock. In the thousands of years that this ancient tool has been used, there haven’t been any changes to the core shape—it’s a timeless design. Though because it’s a squatty vessel with legs, molcajetes are sometimes carved into animal shapes such as a bull or a pig.
A molcajete is an extremely durable piece of cookware, so durable, in fact, that in Mexico people pass down their well-loved molcajetes to the next generation, just as Southerners pass down cast-iron cookware to their children and grandchildren. And this is the key: a molcajete only gets better with use, as it absorbs flavors and reflects these back into whatever you’re currently making. A well-seasoned molcajete also is smooth and is no longer in danger of shedding lava-rock grit into your food.
10 Steps to Seasoning a Molcajete
1. On the way to Spanish Harlem to buy a molcajete at the Mexican grocery that you know sells them, pop into a chain home-furnishings store. Yep, they’re having a sale and included in said bargains is a molcajete. It looks pretty and the price is right, so you buy it.
2. Follow the seasoning instructions that come with the molcajete. The first step is to soak the molcajete in water for a few hours. No problem.
3. After you’ve dried the molcajete,take a small handful (about 1/4 of a cup) of rice and pound it into the molcajete until the rice turns into a grey powder. Repeat this process until rice no longer turns grey but instead stays white.
4. Clean up the rice that has shot out of the molcajete as you’ve been pounding it. You’ll need a vacuum (with hose attachments) and a screwdriver (to wedge up you laptop’s keyboard to pull out errant kernels—yes, that’s why your “T” and “F” keys no longer work). But no matter how thorough you are, please don’t be surprised if you see rice all over the house for weeks—it happens to the best of us.
5. Smash into the molcajete some garlic, cumin seeds, rock salt and cilantro. Create a paste and let it sit overnight so that the molcajete can absorb the flavors. When you clean it the next day, don’t be alarmed if small patches of the molcajete are now stained green—chlorophyll is good for you.
6. If the big-box store’s instructions are to be believed, the molcajete should now be seasoned. Make a batch ofguacamole, take a bite, and get a mouthful of grit. Repeat steps two through five, about 20 times.
7. After going through seven avocados, 14 tomatoes, 21 cloves of garlic, a pound of cilantro, countless cumin seeds and chunks of rock salt, you finally admit to yourself that your salsas still have grit in them.
8. Texan food writer Melissa Guerra recommends using a wire brush to season a molcajete, so you buy one at the hardware store. You spend the rest of the evening scrubbing your molcajete with the brush, subsequently scraping your knuckles until they bleed a little bit into the bowl. But that’s OK—blood has iron, right? And that’s good for you.
9. You make a batch of salsa. Grit. You ask around and the consensus is that the big-box store might be selling molcajetes that are partially made out of concrete and no matter what you do, it will never, ever be smooth and grit free because the stone is just too soft. Yes, you’ve bought an overpriced decorative bowl, useful only for showing off those tomatoes you bought at the farmer’s market.
10. Head up to Spanish Harlem, buy a molcajete from the Mexican grocery store you intended to buy one from in the first place and notice that it looks exactly like the one your bed and breakfast used in Mexico (it’s shaped like a pig!). Take it home and repeat steps two through five. Make a batch of salsa, and enjoy it—grit free!


No comments:
Post a Comment